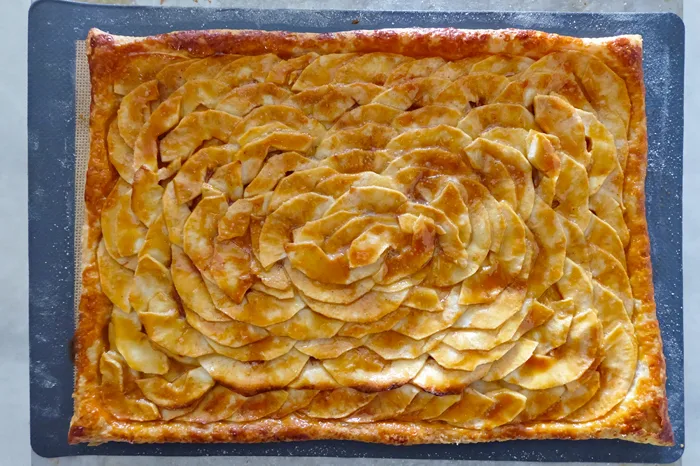
Ooooooooh glorious apple season. The joyous gift that keeps on giving! Such as this Apple Mosaic Tart!
Ok, don’t be intimidated by this apple tart though. It does look uber fancy and may give an air of unachievable but in actuality, it is surprisingly easy.
Yes, it will be a crowd-pleaser, you’ll get oodles of ooh’s and ahh’s and
swoons, people fanning themselves. It looks complicated, but really, it’s
easy as, well, pie. Maybe, maaaaybe it’s
even easier!
This totally is casual-dinner worthy, fancy-dinner worthy, and I’d even say brunch worthy. Or screw it, every-day worthy!
I will give you that there’s time involved here but that’s mostly in peeling, slicing, and laying out the apples. See, the apples are what make this dessert, making it visually appealing so take the time to slice them nicely and evenly. Or maybe I’m just a slow slicer.
If you have a mandoline,* your slicing will be exact and speedy. I’ve banned the darn gizmo from our household though as we’ve had too many ugly incidents around here. Poof, evicted. But, if you can manage the thing, all praise to you, go for it.
To answer your question, I have not tried slicing the apples in a food processor. You want them on the thinner side and I haven’t measured what thickness a slice is out of the machine but I suspect it’s on the thicker side, or wait, maybe too thin, I dunno.
The tricky part is the caramel. Sigh….
Again, maybe that’s me. I am terrible at melting sugar. More often than not it takes me several tries as it’s usually a disaster.
Heh, ok, bear with me though. It tastes phenomenal so it’s totally worth the effort, I swear!
The first time I made this was for Mike and I and my folks. It was a hit instantly with yep, the ooh’s and ahh’s and the oh this is so tasty’s. Mike even requested it recently, mentioning that it is one of my top tier desserts, so, believe him, heh!
The recipe comes from the well respected Smitten Kitchen, one of the blogs we spotlight as suggested reading in our right sidebar o’er by ‘dere.
You’re more than welcome to make your own puff pastry for this and I have indeed contemplated doing so with a rough puff recipe but hey, when it’s so simple to pick up a box of the frozen stuff, it’s hard to pass up that shortcut.
Heh, maybe someday! Or not….what if it’s better….aw jeez then I’m in trouble. Hm.
So defrost one piece of puff in the fridge overnight but if you’re time crunched (ah pun, puff, crunch, heh), I’ve defrosted it on the counter then promptly refrigerated it. It works out great, no loss of flaky layers or nothin’.
I’d suggest making the caramel sauce first in case you run into trouble. Having it ready to go is comforting instead of stressing over it while the tart is baking in the oven.
If you’re anything like me, making caramel is fraught with anxiety. I’ve learned to heat the sugar stupidly slow on medium-low to low, let it take its time and leave it be. I mean, keep a close eye on it but don’t be poking at it or stirring or swirling, just low and slow until it starts turning that wonderful brown. Make sure the sugar is an even layer and all lumps have been smushed before heating.
Next, roll out the puff, place it onto a parchment lined or
silicone mat* lined cookie sheet then pop it back in the fridge.
The apples are next. Peel,
core, and slice. Aim for
thin slices in the 1/16 to 1/18” thick department; I’m usually somewhere
between. The tart spends
minimal time in the oven so thicker slices won’t cook through properly and
the pastry will burn.
As always, I like to mix my apples and use two to three different varieties for differing flavors, textures, and sweetness levels. To me, it makes a huge difference and really puts this puppy over the top.
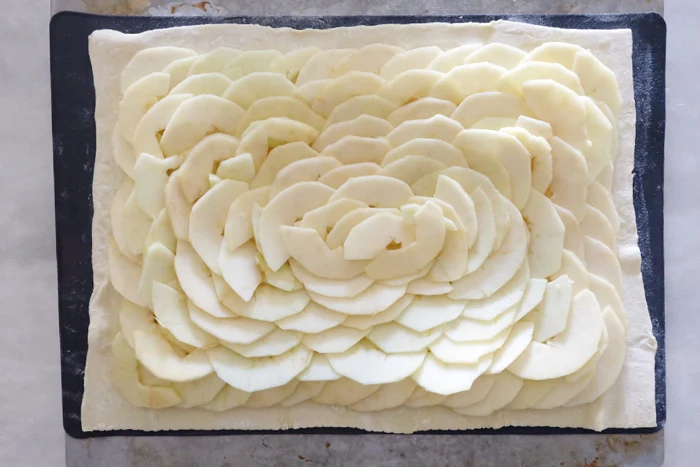
So, now to line ’em up. Like you’re making a continuous path of dominoes, lay out your apples starting near the edge of the puff pastry and circle around, circle around, circle until you get to the center.
Adjust as necessary, fill in little spots to prop pieces up, arrange it
nicely so it’s super pretty. Trust me, you’re gonna feel fancy pants and impressed with yourself
here.
Sprinkle sprinkle with cinnamon sugar…..I have a container of cinnamon and
sugar so I usually just use that, sprinkle at will. And the butter to
dot? I cube that stuff within an inch of its life so that butter gets
everywhere. Heh, I like butter. It should be everywhere!
Pop that sucker in the oven for a bit then you’ll pop it out to get the
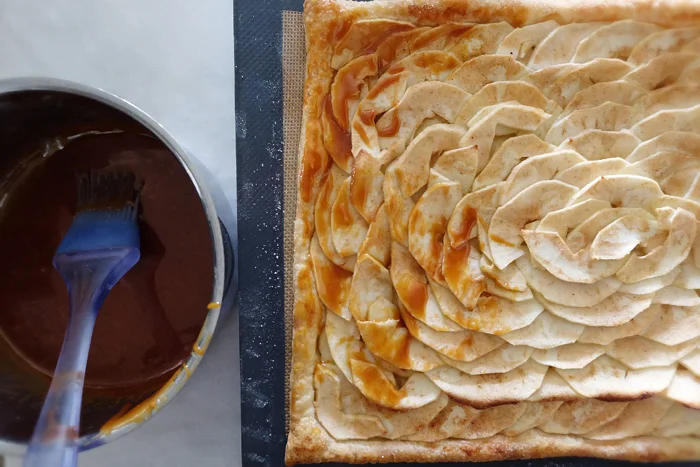
caramel on. You can use a
pastry brush* for this, brush super super gently to as to not disturb your pretty
pattern or use the brush to drizzle it over the apples. I’ve done both. Both work.
Brush the crispy puff pastry edges too.
Pop that tart back in the oven for a short stint and holy moly, get ready
for an awesome dessert.
Serve this plain as-is at room temp, warmed, with whipped cream, with ice
cream….however you’d like and no worries, you absolutely will not go wrong
however you serve this apple tart, trust me as we’ve tried them all!
Or whoa, sprinkle some grated cheese, top with baby greens maybe,
nuts, take this thing a whole new direction! Oh the versatility,
swoon!
So good. Whooooie!
Happy baking!
If you’re looking for more terrific apple recipes, be sure to
click on over. Or,
browse them all!
Yuuummm-mmmee.
Note: This content originally appeared on Flaky Bakers.

*The mandoline slicers, silicone baking mats, and pastry brushes are Amazon affiliate links. Happy baking, thanks! Please see the "info" tab for more, well, info.
Ok, don’t be intimidated by this apple tart though. It does look uber fancy and may give an air of unachievable but in actuality, it is surprisingly easy.

|
| Looks hard, is not! Looks deeeelicious, is indeed! |
This totally is casual-dinner worthy, fancy-dinner worthy, and I’d even say brunch worthy. Or screw it, every-day worthy!
I will give you that there’s time involved here but that’s mostly in peeling, slicing, and laying out the apples. See, the apples are what make this dessert, making it visually appealing so take the time to slice them nicely and evenly. Or maybe I’m just a slow slicer.
If you have a mandoline,* your slicing will be exact and speedy. I’ve banned the darn gizmo from our household though as we’ve had too many ugly incidents around here. Poof, evicted. But, if you can manage the thing, all praise to you, go for it.
To answer your question, I have not tried slicing the apples in a food processor. You want them on the thinner side and I haven’t measured what thickness a slice is out of the machine but I suspect it’s on the thicker side, or wait, maybe too thin, I dunno.

|
| I am a by-hand slicer of apples, thank you. I like my digits intact. |
Again, maybe that’s me. I am terrible at melting sugar. More often than not it takes me several tries as it’s usually a disaster.
Heh, ok, bear with me though. It tastes phenomenal so it’s totally worth the effort, I swear!
The first time I made this was for Mike and I and my folks. It was a hit instantly with yep, the ooh’s and ahh’s and the oh this is so tasty’s. Mike even requested it recently, mentioning that it is one of my top tier desserts, so, believe him, heh!
The recipe comes from the well respected Smitten Kitchen, one of the blogs we spotlight as suggested reading in our right sidebar o’er by ‘dere.
You’re more than welcome to make your own puff pastry for this and I have indeed contemplated doing so with a rough puff recipe but hey, when it’s so simple to pick up a box of the frozen stuff, it’s hard to pass up that shortcut.
Heh, maybe someday! Or not….what if it’s better….aw jeez then I’m in trouble. Hm.
So defrost one piece of puff in the fridge overnight but if you’re time crunched (ah pun, puff, crunch, heh), I’ve defrosted it on the counter then promptly refrigerated it. It works out great, no loss of flaky layers or nothin’.
I’d suggest making the caramel sauce first in case you run into trouble. Having it ready to go is comforting instead of stressing over it while the tart is baking in the oven.
If you’re anything like me, making caramel is fraught with anxiety. I’ve learned to heat the sugar stupidly slow on medium-low to low, let it take its time and leave it be. I mean, keep a close eye on it but don’t be poking at it or stirring or swirling, just low and slow until it starts turning that wonderful brown. Make sure the sugar is an even layer and all lumps have been smushed before heating.

|
| Top left, the ingredients. Bottom left, wow, oh my, I did it! Side right, combining for the final caramel. |

|
| I don’t follow the original direction on this, I just kinda roll it out ’til it’s about the size of the silicone mat. |
As always, I like to mix my apples and use two to three different varieties for differing flavors, textures, and sweetness levels. To me, it makes a huge difference and really puts this puppy over the top.
So, now to line ’em up. Like you’re making a continuous path of dominoes, lay out your apples starting near the edge of the puff pastry and circle around, circle around, circle until you get to the center.

|
| ‘Round and ’round ya go, overlapping and tucking and layering them apple slices. |

|
| Fancy pants! Look what you can do! |

|
| Getting the final touches on there, the cinnamon sugar and baby butter cubes. |

|
| Gently gently here, folks. You worked so hard on making the slices pretty, be gentle so they remain in place. |

|
| Voila! Oooh, so good, yeah?! |

|
| Wowza. |
Happy baking!

|
| Yeah, hahahaha, like this is the average size slice in our house….not. |
Yuuummm-mmmee.
Note: This content originally appeared on Flaky Bakers.

Apple Mosaic Tart
Yield
12 slicesPrep time
45 MinCook time
40 MinTotal time
1 H & 25 MA supremely elegant yet simple and delicious tart to celebrate apple season with merely apples, caramel, and flaky puff pastry.
Ingredients
Caramel
- 1/4 cup (50 g) granulated sugar
- 2 tablespoons (28 g) unsalted butter
- 1/4 teaspoon (1.5 g) fine sea salt
- 2 tablespoons (30 ml) heavy cream
Pastry
- 1 sheet puff pastry dough,** defrosted
- 1 1/2 pounds (680 g) apples, about 4 medium apples
- 2 tablespoons (25 g) granulated sugar
- 1/2 teaspoon (1.3 g) cinnamon more or less as desired, optional
- 2 tablespoons (28 g) unsalted butter cold, cut into tiny cubes
Instructions
Caramel
- Begin with the caramel by heating the sugar in a saucepan slowly on low heat. Make sure the sugar is spread evenly across the bottom and is lump-free. Avoid disturbing the sugar until it begins to melt and turn golden brown.
- Cook the sugar until the desired shade of golden brown is reached and remove from the heat.
- Add the butter, salt, and stir gently without splashing until blended. Add the cream and stir, placing the pan back on low to medium-low heat to combine the ingredients. Once thoroughly mixed, leave the saucepan set to warm.
Pastry
- Preheat the oven to 400° F (200° C). Place either parchment paper or a silicone mat on a cookie sheet to line.
- On a lightly floured surface, roll the puff pastry to slightly under the size of your cookie sheet or just under the silicone mat size, approximately 11x15. It doesn’t need to be exact. Place the puff pastry on the lined cookie sheet and refrigerate until needed.
- Peel, core, and slice the apples thinly, between 1/16” to 1/8” thick. Remove the puff pastry from the refrigerator. Begin lining the apples around the edge of the pastry, leaving a 1/2” border edge, overlapping the slices. Continue around in one continuous line of rectangles until the center is reached.
- Combine the 2 tablespoons of sugar with the cinnamon if using and sprinkle evenly over the apples. Dot the apples with the cubed butter.
- Place in the oven and bake for 30 minutes. The apples will look a bit dried and soft plus be lightly browned. If the puff pastry is bubbling up too much, release the air by poking a small hole.
- With a pastry brush, very gently brush the apples (so as to not move them) and edges of the puff pastry with the caramel. Place the tart back in the oven for about 5-10 minutes more, until everything has browned nicely and the caramel is bubbling slightly.
- Serve immediately or cool to room temperature.
Notes:
**Note: Puff pastry typically comes as a package of two. Use one of the two for this recipe.
Adapted from Smitten Kitchen.
Nutrition Facts
Calories
215.74Fat (grams)
9.66Sat. Fat (grams)
4.42Carbs (grams)
32.93Fiber (grams)
3.24Net carbs
29.68Sugar (grams)
18.49Protein (grams)
1.42Sodium (milligrams)
156.78Cholesterol (grams)
11.60Please see the "info" section for nutrition details and information about gram weights.
*The mandoline slicers, silicone baking mats, and pastry brushes are Amazon affiliate links. Happy baking, thanks! Please see the "info" tab for more, well, info.


Share your thoughts :
Spam is not good for baking. Please don't leave any, thanks.